Showing posts with label liquid watercolors. Show all posts

6/26/12

Things to Make - Watercolor Nature Prints

top

The inspiration for this project came from this post on the Artful Parent. And though we made a big mess, we had a ton of fun working on it.

First we went for a nature walk, looking for things that would "print well" - so we picked up everything from leaves to sticks to stones. T loved this part (as you can tell from the HUGE pile of stuff pictured below).

After we dumped our wares on the table, we poured liquid watercolors into blank stamp pads from Discount School Supplies. If you don't have the stamp pads you could try pouring the watercolors onto felt or even a sponge or you could also just use regular stamp pads. Then the kids started printing. Some objects worked better than others (sticks and rocks didn't do much), but all three kids liked trying out different objects and combinations, especially three-year old T, who could have stamped for hours.

hunt

The walk was a blast. So much fun to notice the details of leaves and all of the different plants around our neighborhood.

make


7/19/11

Things to Make - Chalk Paint & Water Murals

shade

One of our top go-to activities this summer has been chalk paint, which I read about on the Frugal Family Fun blog. The kids all love mixing the colors to make their own paint, plus their drawings actually last for a few days on the sidewalk.

Here's the scoop:

1. Mix cornstarch and water in a 1:1 ratio. The exact ratio isn't too important so you can wing it somewhat. These are also the ingredients for goo, so ideally you could make goo first and when the kids get bored with that add some water and make paint.

2. Divide the above mixture into small cups and put a few drops of liquid watercolor or food coloring in each cup. Mix.

3. Paint your sidewalks.

bright

Of course, some days even chalk paint seems too complicated, so we've also spent a lot of time making water murals on the decks and sidewalks. All three kids seem to love this and there's no clean up required, plus I personally find it calming to draw things and watch them disappear.

water

CREATIVE IDEAS FROM AROUND THE WEB:

*I love these paper flowers, plus they look super easy to make.

*I think billy button flowers are so pretty, so I really want to try making this felt version.

*Wildflower crowns - how beautiful.

*Cardboard box houses - this doesn't look too complicated.

*Swirly stones - heat the stones and color on them with melted crayon.

*Glow in the dark firefly jars, magical.

*Brown paper bag hanging stars. Awesome.

*This homemade solar system project looks like so much fun, plus the results are beautiful.

4/26/11

Things to Make - Tissue Paper Tie-Dye

howto

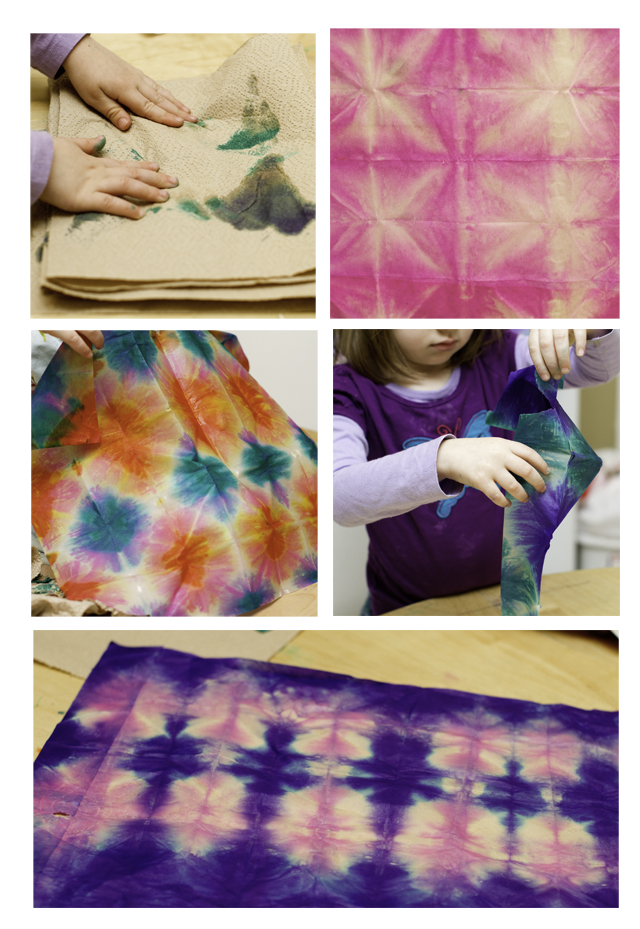
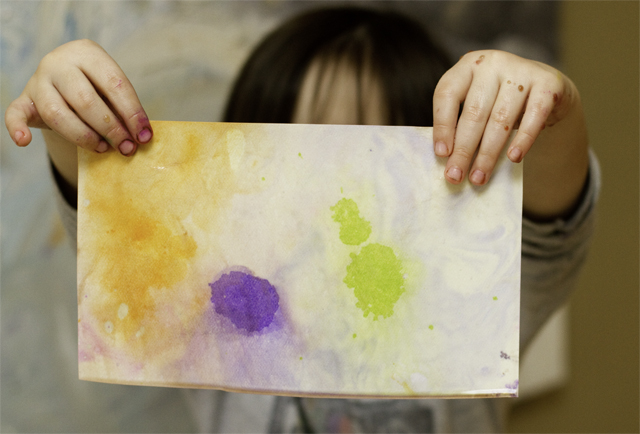
For the last few months I've been saving the tissue-paper wrapping that comes in boxes (Amazon uses it frequently), I didn't really have a plan for what to do with it, it just seemed worthy of keeping. Well, I finally found the perfect rainy day project for using it 
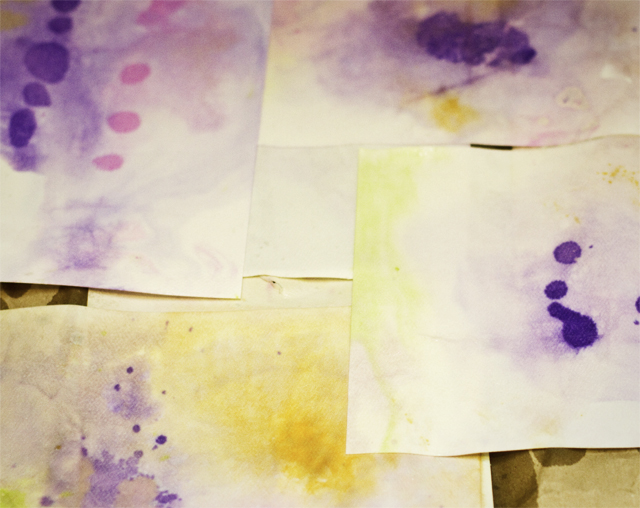
on this site - tissue paper tie-dye. The results of this project were quite beautiful, as evidenced by the fact that the girls hung their creations all over the walls of their room.
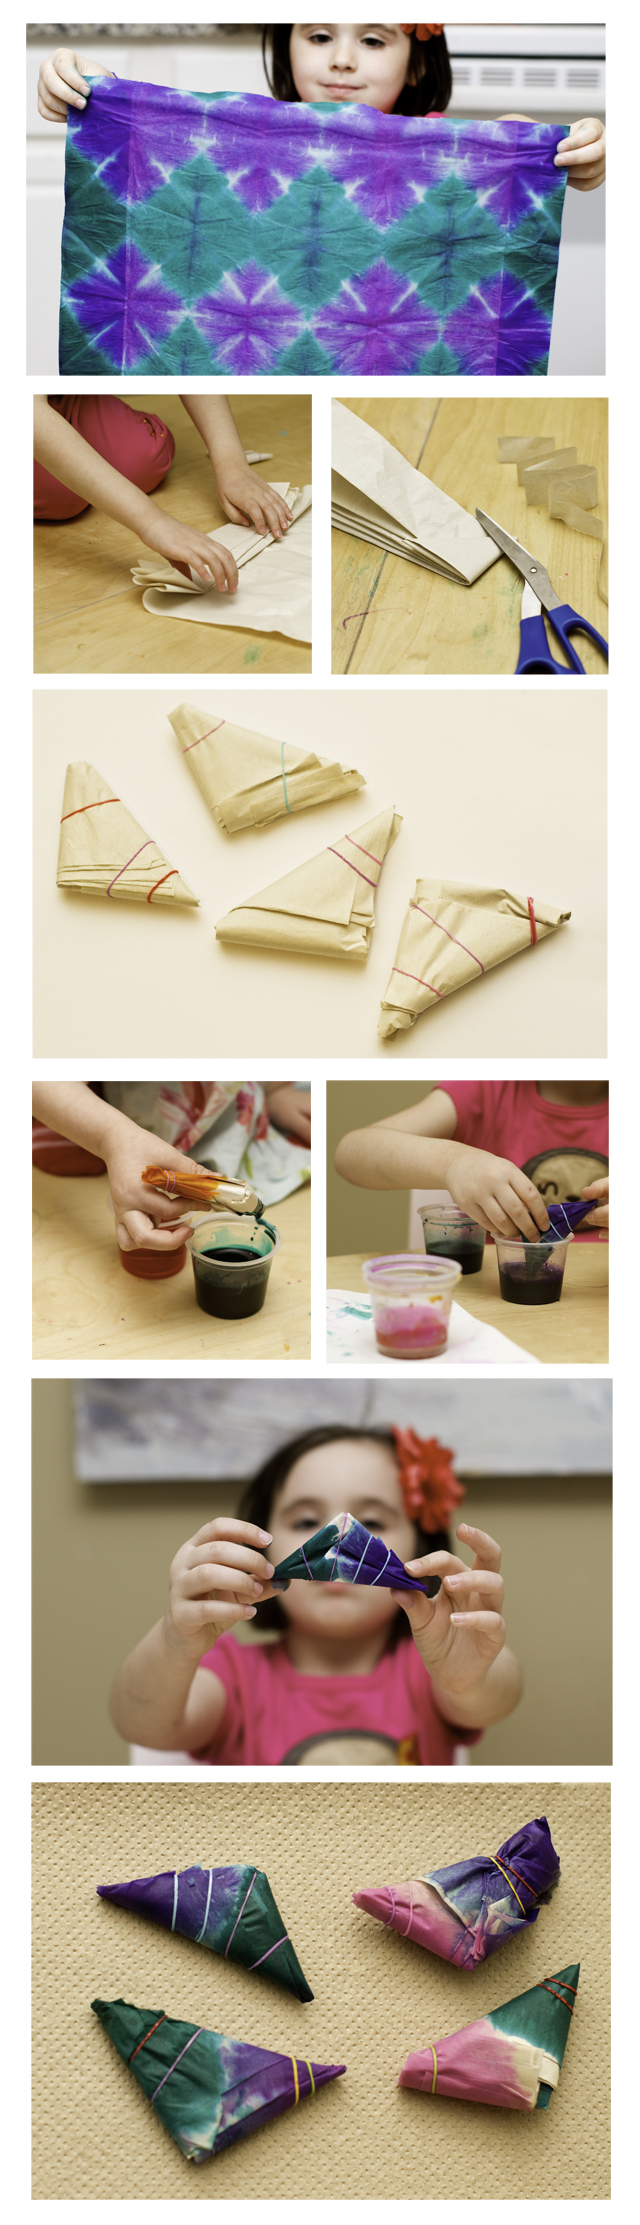
Here's the scoop:

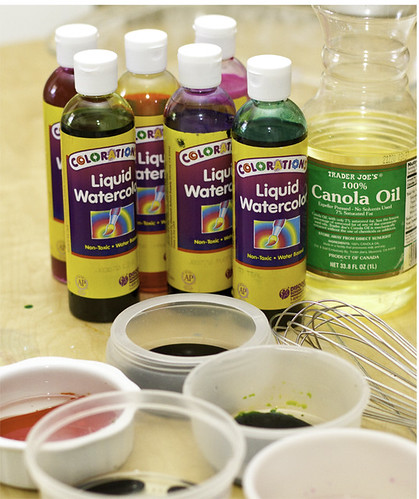
You'll need - tissue paper, rubber bands, and liquid watercolors or food coloring

1. Cut the tissue paper into large rectangles (about 16x20 inches).

2. Accordion fold the paper back and forth into one long rectangle.

3. Then fold the bottom right corner to the left edge to make a triangle. Continue turning and pressing until you have one large triangle.

4. Place rubber bands on the paper triangle.

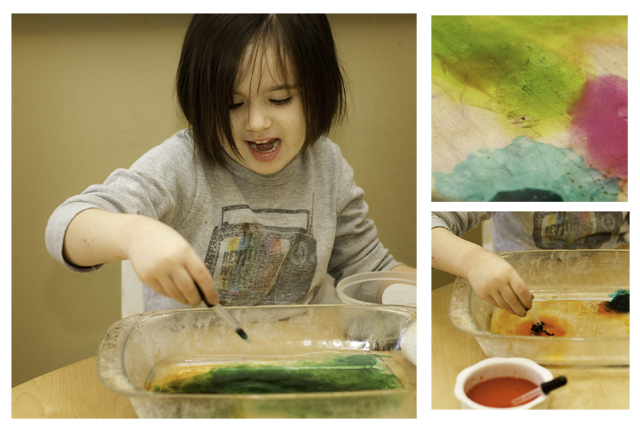
5. Dip in different colors of food coloring or liquid watercolors

6. We then patted the triangle-paper down with paper towels to get rid of some of the excess liquid.

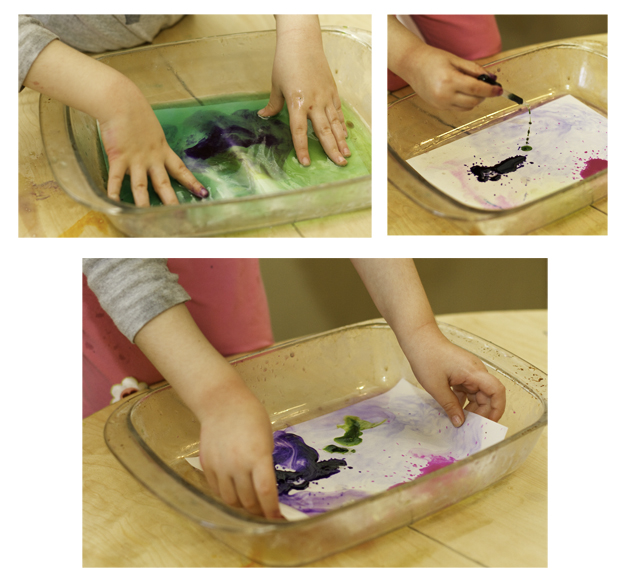
7. CAREFULLY unwrap. This would probably work best if you waited until the paper was dry, but we were too impatient.

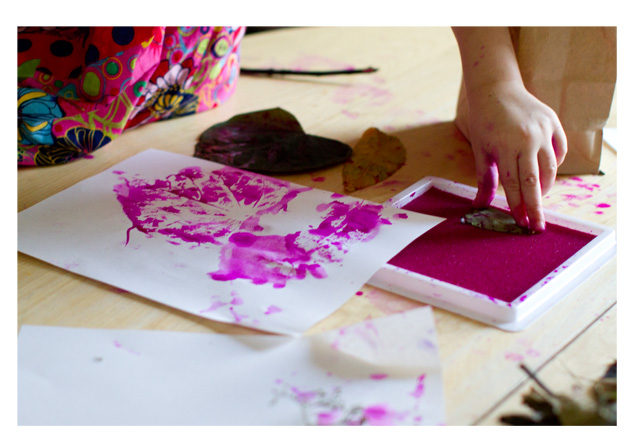
ART IDEAS FROM AROUND THE WEB:

*I love this over the door organizer for art supplies (why didn't I think of it??)

*Spoonflower (the design and print your own fabric company) seems to be all over the internet. Seems like a fun idea. Click here to read Mommycoddle's story about her experience. (Note - Spoonflower is also a great place to shop for fabric).

*A homemade "lava lamp" (it's much easier than it sounds)

*I just discovered this Toys from Trash website through Mini-Eco, WOW, it's amazing. I could spend days going through it all.

*I love these beautiful houses made from old cereal boxes.

*If I could sew, I would own several of these and wear them all year long.

*Milk + food coloring + dish soap = awesomeness, click here for the scoop.

*DIY shredded paper seed starters

*ReadyMade's Top 20 Projects of 2010 - wow, there are a lot of creative people out there. I really like the kid-tent and the "book wall".

*DIY fabric wall stickers (so so cool).

result

1/25/11

Things to Make - Salty Watercolors & Water Painting

top

Sorry for all the watercolor posts lately - once I buy something I have to use it (click here for past watercolor posts). I learned about salty watercolors from this post in the Artful Parent's archives (wow, there's a wealth of information over there) and i have to say this was one of my favorite kid projects EVER. First of all, the mess factor isn't too bad. Second of all, set up is relatively easy. And, finally, the project occupied the girls for long periods of time with very little parental involvement (YAY!!). If I had a ratings system, I'd give it the highest rating. Here's the scoop:

Materials - Liquid watercolors (or food coloring), Elmers glue (or an equivalent), table salt, a pan or platter (to pour the salt over), and thick paper or cardboard (ordinary paper will buckle from the salt).

1. First the girls drew pictures with glue on watercolor paper.

2. Then we poured salt over the still-wet glue. We used the pan to shake off the salt that didn't stick.

3. Finally the girls touched watercolor-dipped paintbrushes onto the still-wet glue/salt designs. The color slowly traveled through their designs, which was really fun to watch.

four

If you've ever wondered what the toddler does during craft-time usually he sleeps. But sometimes he doesn't. I probably should let him paint with real paint but it's just so messy, so for now I've tricked him into painting with water. And that works for awhile (until he realizes that his pictures don't look like the girls' pictures).

babyart

1/18/11

Things to Make - Marbleized Paper w/Shaving Cream

both

Last week I posted about making marbleized paper with oil and watercolors. The kids loved it so much that I figured I'd attempt another marbleized project, this time with shaving cream. Shaving cream induced marbleization is all over the web (for both kids and adults), I think I first learned of the technique a few years ago while reading a magazine in the doctor's waiting room. I googled for a refresher and found this tutorial on WikiHow.

On the upside, both girls really seemed to like this project (almost, but not quite, as much as marbleizing with oil). P, in particular, loved the feel of working with shaving cream (which is pretty normal, according to A Passion for Play occupational therapists frequently use shaving cream for working - and playing - with kids. And A Passion for Play suggests different activities to try with shaving cream). Plus, the resulting papers were quite lovely (if I do say so myself). On the downside, the smell of shaving cream (especially in a small kitchen) was a little overwhelming (to put it mildly). And all the paper ended up smelling like shaving cream, making it an odd choice for gift giving.

Here's the scoop: You need - a pan, shaving cream, liquid watercolors or food coloring, a squeegee (or anything flat, like a CD case or even a hard piece of cardboard), and popsicle sticks or forks.

1. Squirt the shaving cream into the pan and use the squeegee (or squeegee equivalent) to make it level and even.

2. Squirt the liquid watercolors (or food coloring) into the pan (on top of the shaving cream). I put the liquid watercolors in several small little bottles (click here to see the ones we used) to make it easier for the girls to handle.

3. The girls used popsicle sticks (but forks would also work) to push the paint around in the shaving cream. This was actually really pretty (well, until they used too much paint and everything turned grey).

4. Place a piece of paper on top of the now colored shaving cream.

5. Scrape the shaving cream off of the paper with the squeegee, a marbleized pattern will remain on the paper.

shavingcream

1/11/11

Things to Make - Marbleized Paper w/ Oil and Watercolors

finalhold

When I read about this project on Tinker Lab, the beautiful photos made me want to try it with my own kids. On the upside, F called it her "favorite craft project ever" (yes, this means we did it again and again throughout the week) on the downside oil is well, sort of oily. Oh well, it's not like we've never trashed the kitchen table before. Here's the scoop:

stuff

You'll need - oil, liquid watercolors (or food coloring), a pan, paper (watercolor paper works best if you have some), small cups to mix the paint, and eyedroppers.

1. Mix 1/2 tsp of oil (we used Canola oil) with 1 tsp of liquid watercolor (or food coloring) in each of several bowls (one for each color). DON'T BE LAZY as this is the most important step. Whisk, whisk. whisk. I (of course) was lazy and barely mixed them, hence the resulting papers look like someone accidentally stained them with oil (oh well, it's the process, right?)

2. Fill the bottom of a pan with a small amount of water (not too much, you can always add more) and squeeze the paint (using droppers) into the pan. We used these droppers (recommended by Tinker Lab), which were easy for the girls to handle. The oilpaint makes "splotches" in the water, that are quite pretty. Even if you don't have paper, the girls had a great time just making water splotches.

fun

3. Place paper on top of the oil-splotched water and let it soak up the colors. Make sure to have a large space where the paper can dry.

three

The girls loved this activity. Plus the vibrant colors helped brighten up the winter blahs. Hope everyone is having a good week - make sure to check in next Tuesday for new way to make marbleized paper.

end

LinkWithin

Related Posts Plugin for WordPress, Blogger...