Showing posts with label tissue paper. Show all posts

2/19/13

Things to Make - Easy Tissue-Paper Suncatchers

untitled (15 of 18).jpg

Our windows needed something pretty to brighten up these winter afternoons, so I cut tissue paper into squares and then had the girls attach them to contact paper. We used a second sheet of contact paper to keep everything in place and hung our creations in the window. Easy.

untitled (1 of 18).jpg

untitled (6 of 18).jpg

untitled (9 of 18).jpg

P's learning about patterns in school, so she had a great time utilizing her new skill. Whereas F went the random route. And T ran around catching imaginary bad guys. So go our weekend mornings . . .

9/27/11

Things to Make - Halloween Stained Glass with Tissue Paper and Liquid Starch

p

When I read about using tissue paper and liquid starch to make stained glass on the Artful Parent I decided it would be the perfect method for crafting Halloween decorations. I bought black, orange, and yellow tissue paper at AC Moore, poured some liquid starch into an clean old yogurt cup, gave P a paint brush and let her create. P decided she wanted to make a pumpkin, so we worked together on creating the circle. I thought it would be cute to use the black tissue paper to make the face but P stated that jack-o-lantern faces looked "too scary." So she decided to let it dry and color on her pumpkin with markers.

When T woke up and F returned from kindergarten they really wanted to make their own creations. I was pretty impressed that this project was so toddler-friendly, T spent over a half hour making a collage with not that much parental involvement. F made a pumpkin and a collage. She also liked coloring with markers on the still-wet tissue paper and watching the color swirl. All in all a pretty easy way to fill an afternoon. And now we're prepared for Halloween.

Here's the scoop: You'll need: liquid starch, tissue paper, wax paper, and paint brushes.

1. Buy liquid starch at the grocery store. Pour a small amount into a container.

2. Cut tissue paper into small pieces.

3. Using a brush, "paint" a small amount of liquid starch onto the wax paper (you may want to put newspaper underneath the paper, it gets messy fast).

4. Arrange tissue paper on the wet wax paper then paint over the tissue paper with more liquid starch.

5. Let dry.

6. Hang in windows. Lovely!!

paper

CREATIVE IDEAS FROM AROUND THE WEB:

*LOVE these DIY popsicle-stick magnets for the fridge.

*Leaf printing on fabric from the Artful Parent.

*This pinterest collection has TONS of great project ideas. Check it out. Also, I have a fall craft project Pinterest collection - click here to view it.

*A face sticker pad!! I need to purchase some of these. This looks like a great activity for a wide variety of ages.

4/26/11

Things to Make - Tissue Paper Tie-Dye

howto

For the last few months I've been saving the tissue-paper wrapping that comes in boxes (Amazon uses it frequently), I didn't really have a plan for what to do with it, it just seemed worthy of keeping. Well, I finally found the perfect rainy day project for using it on this site - tissue paper tie-dye. The results of this project were quite beautiful, as evidenced by the fact that the girls hung their creations all over the walls of their room.

Here's the scoop:

You'll need - tissue paper, rubber bands, and liquid watercolors or food coloring

1. Cut the tissue paper into large rectangles (about 16x20 inches).

2. Accordion fold the paper back and forth into one long rectangle.

3. Then fold the bottom right corner to the left edge to make a triangle. Continue turning and pressing until you have one large triangle.

4. Place rubber bands on the paper triangle.

5. Dip in different colors of food coloring or liquid watercolors

6. We then patted the triangle-paper down with paper towels to get rid of some of the excess liquid.

7. CAREFULLY unwrap. This would probably work best if you waited until the paper was dry, but we were too impatient.

ART IDEAS FROM AROUND THE WEB:

*I love this over the door organizer for art supplies (why didn't I think of it??)

*Spoonflower (the design and print your own fabric company) seems to be all over the internet. Seems like a fun idea. Click here to read Mommycoddle's story about her experience. (Note - Spoonflower is also a great place to shop for fabric).

*A homemade "lava lamp" (it's much easier than it sounds)

*I just discovered this Toys from Trash website through Mini-Eco, WOW, it's amazing. I could spend days going through it all.

*I love these beautiful houses made from old cereal boxes.

*If I could sew, I would own several of these and wear them all year long.

*Milk + food coloring + dish soap = awesomeness, click here for the scoop.

*DIY shredded paper seed starters

*ReadyMade's Top 20 Projects of 2010 - wow, there are a lot of creative people out there. I really like the kid-tent and the "book wall".

*DIY fabric wall stickers (so so cool).

result

3/15/11

Things to Make - Tissue Paper Flowers

create

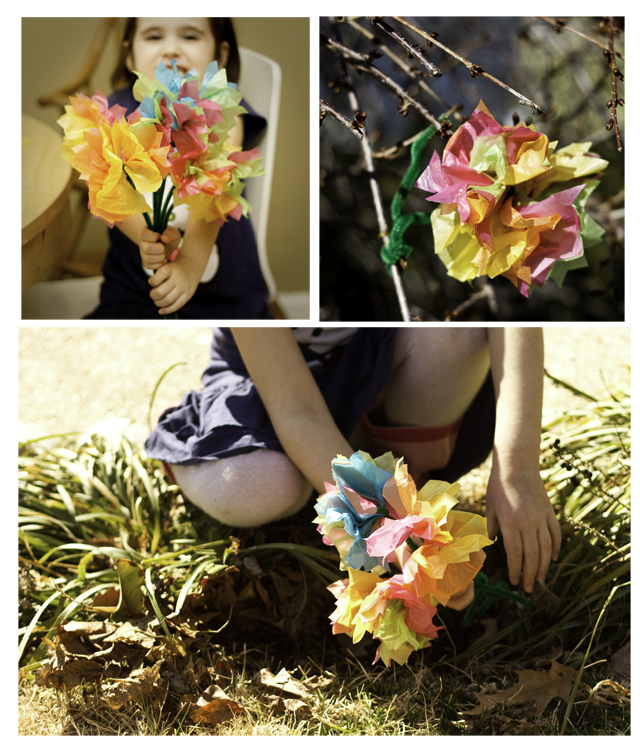
So lately we've grown a little obsessed with tissue paper flowers. Maybe I've been living in kidville for too long (maybe???) but I find these flowers incredibly beautiful. I'd even consider giving them to my own friends as presents (sorry everyone, no more gift cards from me). What better way to make someone's day then to hand them a bouquet of hand-made flowers? Okay, so maybe I have been in kidville too long, but if you doubt me then check out this Martha Stewart version. Pretty classy, huh? (link courtesy of Bluebird Baby). I feel if I master the skill while my children are young, I have a real future ahead of me.

Here's the scoop, courtesy of the FrugalFamily Fun Blog (which I highly suggest checking out, tons of great ideas over there); you'll need: tissue paper (different colors), green pipe cleaners, and scissors.

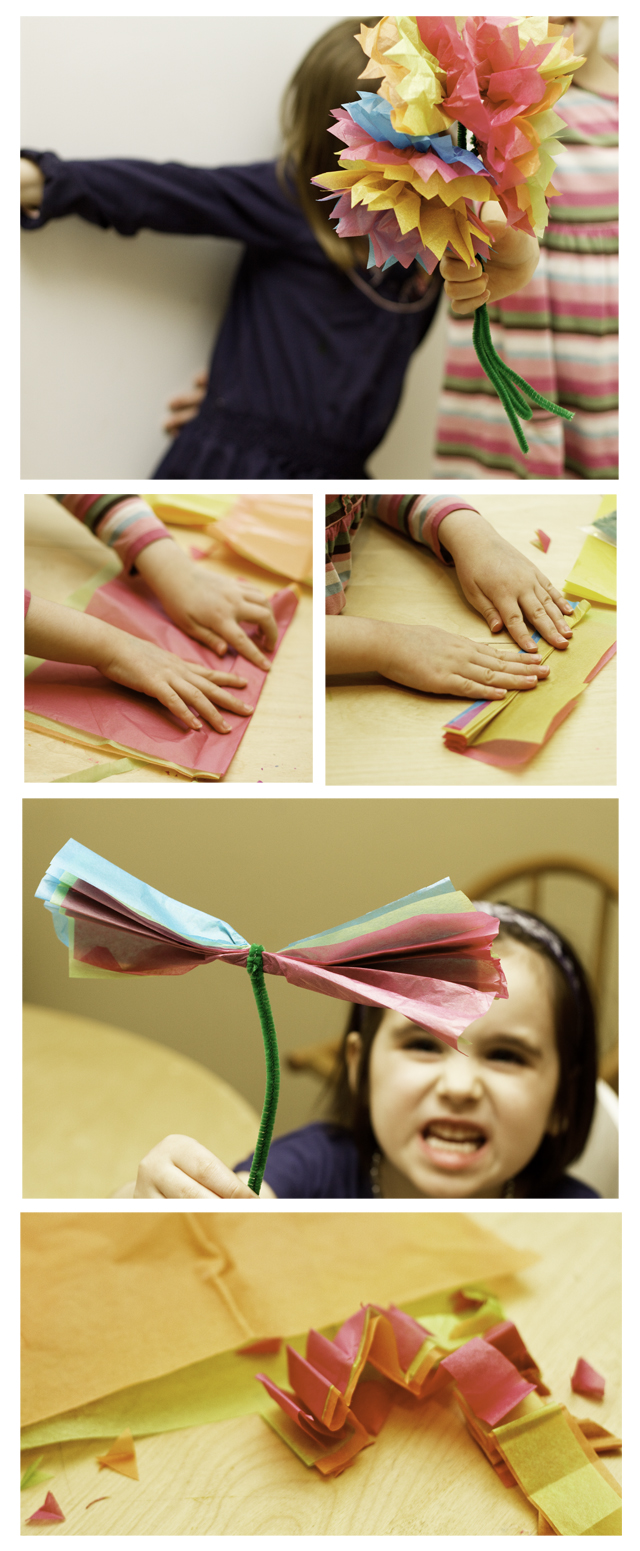
1. Cut 3 or more sheets of tissue paper to a 5x10 size (I suggest starting here, then you can try out different sizes).

2. Stack the papers on top of each other, then fold them accordion style (about 1 inch) until you have one long, thick skinny rectangle. F did all the folding, which she was pretty good at.

3. Twist a pipe cleaner in the middle of the rectangle.

4. Cut the ends of the rectangle - either into diamonds or half circles depending on the look you want (we made diamonds)

5. Separate the layers of paper by hand and watch "the magic happen" - voila! A flower!

We started by giving away bouquets, then F thought it would be fun to plant some of the tissue paper flowers in the ground. Which was fun, until I realized that I don't really like to dig holes. So instead we hung some on our tree (to encourage spring along).
__________________________________

More Art Ideas from Around the Web:

*Click here to learn how to make your own non-toxic watercolors (using kitchen staples). For my posts on things to do with liquid watercolors, click here.

*These paper doll frames are simply gorgeous. I wish they were for sale.

*We've never tried finger knitting, but it sure looks like fun. Click here for the info.

*For St. Patrick's Day - these shamrock prints made from apples are so cute, as are these shamrock stamps made from paper towel rolls.

•Beautiful hand-print whales at MommyCoddle.

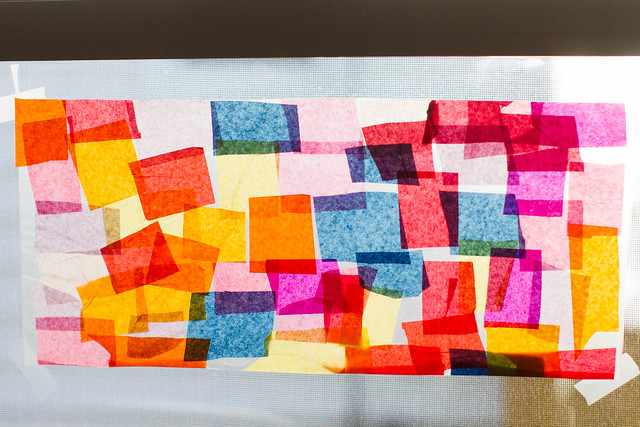
*This recycled cup sun catcher looks like something kids would have a great time making.

*I love these make-it-yourself window clings using puffy paint, we might have to try this soon.

plant

LinkWithin

Related Posts Plugin for WordPress, Blogger...